1. add_place화면에 내 위치 확인과, 구글맵을 연동시켜보자.
다트 패키지에서 location과, http 를 다운 받아준다.
특히 location은 ios같은 경우 추가 세팅이 필요하니, 상세 내용을 잘 보자.
google map api를 사용하기 위해서 아래 사이트에서 계정 가입(vinaarba@gmail.com)을 하고, 데이터 전송 시 필요한, 키 값을 받아낸다.
https://developers.google.com/maps?hl=ko
Google Maps Platform | Google for Developers
Google Maps Platform 설명
developers.google.com
 키 값은 여기서 확인 가능
2. 지오코딩 (Geocoding)과 map static api 이해
일반적으로 지오코딩이라는 용어는 사람이 읽을 수 있는 주소를 지도상의 위치로 변환하는 과정을 나타냅니다. 그 반대로 지도상의 위치를 사람이 읽을 수 있는 주소로 변환하는 과정을 역 지오코딩이라고 합니다.
그리고, map static api는 현재 위치 데이터를 기반으로 구글지도에 스냅샷으로 보여주는 api이다.
https://developers.google.com/maps/documentation/geocoding/requests-reverse-geocoding?hl=ko
역 지오코딩 (주소 조회) 요청 및 응답 | Geocoding API | Google for Developers
이 페이지는 Cloud Translation API를 통해 번역되었습니다. Switch to English 의견 보내기 역 지오코딩 (주소 조회) 요청 및 응답 컬렉션을 사용해 정리하기 내 환경설정을 기준으로 콘텐츠를 저장하고 분
developers.google.com
https://developers.google.com/maps/documentation/maps-static/overview?hl=ko
개요 | Maps Static API | Google for Developers
이 페이지는 Cloud Translation API를 통해 번역되었습니다. Switch to English 의견 보내기 개요 컬렉션을 사용해 정리하기 내 환경설정을 기준으로 콘텐츠를 저장하고 분류하세요. 시작하기 전에: Maps Stat
developers.google.com
- models/place.dart
import 'dart:io';
import 'package:uuid/uuid.dart';
const uuid = Uuid();
class PlaceLocation {
const PlaceLocation({
required this.latitude,
required this.longitude,
required this.address,
});
final double latitude;
final double longitude;
final String address;
}
class Place {
Place({
required this.title,
required this.image,
// required this.location,
}) : id = uuid.v4();
final String id;
final String title;
final File image;
// final PlaceLocation location;
}
1) 모델에 PlaceLocation 클래스를 추가해주고 이를 place 값으로 연동해줄 예정이다. (해당 강의에서는 기본 에뮬레이터 디폴트 값 주소로 찍힐 예정). 위도, 경도, 주소값이 들어간다
- add_place.dart
import 'dart:io';
import 'package:favorite_places/widgets/location_input.dart';
import 'package:flutter_riverpod/flutter_riverpod.dart';
import 'package:flutter/material.dart';
import 'package:favorite_places/widgets/image_input.dart';
import 'package:favorite_places/providers/user_places.dart';
class AddPlaceScreen extends ConsumerStatefulWidget {
const AddPlaceScreen({super.key});
@override
ConsumerState<AddPlaceScreen> createState() {
return _AddPlaceScreenState();
}
}
class _AddPlaceScreenState extends ConsumerState<AddPlaceScreen> {
final _titleController = TextEditingController();
File? _selectedImage;
void _savePlace() {
final enteredTitle = _titleController.text;
if (enteredTitle.isEmpty || _selectedImage == null) {
return;
}
ref
.read(userPlacesProvider.notifier)
.addPlace(enteredTitle, _selectedImage!);
Navigator.of(context).pop();
}
@override
void dispose() {
_titleController.dispose();
super.dispose();
}
@override
Widget build(BuildContext context) {
return Scaffold(
appBar: AppBar(
title: const Text('Add new Place'),
),
body: SingleChildScrollView(
padding: const EdgeInsets.all(12),
child: Column(
children: [
TextField(
decoration: const InputDecoration(labelText: 'Title'),
controller: _titleController,
style: TextStyle(
color: Theme.of(context).colorScheme.onBackground,
),
),
const SizedBox(height: 10),
ImageInput(
onPickImage: (image) {
_selectedImage = image;
},
),
const SizedBox(height: 10),
const LocationInput(),
const SizedBox(height: 16),
ElevatedButton.icon(
onPressed: _savePlace,
icon: const Icon(Icons.add),
label: const Text('Add Place'),
),
],
),
),
);
}
}
1) LocationInput 위젯 추가
- location_input.dart
import 'dart:convert';
import 'package:flutter/material.dart';
import 'package:location/location.dart';
import 'package:http/http.dart' as http;
import 'package:favorite_places/models/place.dart';
class LocationInput extends StatefulWidget {
const LocationInput({super.key});
@override
State<LocationInput> createState() {
return _LocationInputState();
}
}
class _LocationInputState extends State<LocationInput> {
PlaceLocation? _pickedLocation;
var _isGettingLocation = false;
String get locationImage {
if (_pickedLocation == null) {
return '';
}
final lat = _pickedLocation!.latitude;
final lng = _pickedLocation!.longitude;
}
void _getCurrentLocation() async {
Location location = Location();
bool serviceEnabled;
PermissionStatus permissionGranted;
LocationData locationData;
serviceEnabled = await location.serviceEnabled();
if (!serviceEnabled) {
serviceEnabled = await location.requestService();
if (!serviceEnabled) {
return;
}
}
permissionGranted = await location.hasPermission();
if (permissionGranted == PermissionStatus.denied) {
permissionGranted = await location.requestPermission();
if (permissionGranted != PermissionStatus.granted) {
return;
}
}
setState(() {
_isGettingLocation = true;
});
locationData = await location.getLocation();
final lat = locationData.latitude;
final lng = locationData.longitude;
if (lat == null || lng == null) {
return;
}
final url = Uri.parse(
final response = await http.get(url);
final resData = json.decode(response.body);
final address = resData['results'][0]['formatted_address'];
setState(() {
_pickedLocation = PlaceLocation(
latitude: lat,
longitude: lng,
address: address,
);
_isGettingLocation = false;
});
}
@override
Widget build(BuildContext context) {
Widget previewContent = Text(
'No location chosen',
textAlign: TextAlign.center,
style: Theme.of(context).textTheme.bodyLarge!.copyWith(
color: Theme.of(context).colorScheme.onBackground,
),
);
if (_pickedLocation != null) {
previewContent = Image.network(
locationImage,
fit: BoxFit.cover,
width: double.infinity,
height: double.infinity,
);
}
if (_isGettingLocation) {
previewContent = const CircularProgressIndicator();
}
return Column(
children: [
Container(
height: 170,
width: double.infinity,
alignment: Alignment.center,
decoration: BoxDecoration(
border: Border.all(
width: 1,
color: Theme.of(context).colorScheme.primary.withOpacity(0.2),
),
),
child: previewContent,
),
Row(
mainAxisAlignment: MainAxisAlignment.spaceEvenly,
children: [
TextButton.icon(
icon: const Icon(Icons.location_on),
label: const Text('Get Current Location'),
onPressed: _getCurrentLocation,
),
TextButton.icon(
icon: const Icon(Icons.map),
label: const Text('Select on Map'),
onPressed: () {},
),
],
),
],
);
}
}
1) 먼저 _getCurrentLocation 함수 부분을 분석해보자.
Location location = Location();
bool serviceEnabled;
PermissionStatus permissionGranted;
LocationData locationData;
serviceEnabled = await location.serviceEnabled();
if (!serviceEnabled) {
serviceEnabled = await location.requestService();
if (!serviceEnabled) {
return;
}
}
permissionGranted = await location.hasPermission();
if (permissionGranted == PermissionStatus.denied) {
permissionGranted = await location.requestPermission();
if (permissionGranted != PermissionStatus.granted) {
return;
}
}
setState(() {
_isGettingLocation = true;
});
--> 할당값 선언 및 권한 승인 부분이고, 모든게 끝나면 setState를 통해 isGettingLocation 값을 true로 변경 (로딩 모양을 위해)
locationData = await location.getLocation();
final lat = locationData.latitude;
final lng = locationData.longitude;
if (lat == null || lng == null) {
return;
}
final url = Uri.parse(
final response = await http.get(url);
final resData = json.decode(response.body);
final address = resData['results'][0]['formatted_address'];
setState(() {
_pickedLocation = PlaceLocation(
latitude: lat,
longitude: lng,
address: address,
);
_isGettingLocation = false;
});
}
--> getLocation을 통해 현재 기기의 위도latitude, 경도longtitude 값을 받아온다.
해당 값이 null이 아니면 api 값에 lat, lng 값과 key값을 넣고, 주소 값을 받아온다.resonse.body값에는 다양한 값이 있고, 그중에 formatted_address가 우리가 쓸 정보임.
그리고 setState를 통해 _pickLocation에 PlaceLocation 모델값을 할당해준다. 그리고 값을 받아왔기 때문에 _isGettingLocation값을 false로 바꿔준다.
그리고 끝으로, 빌드 부분에 컨테이너 child에는 previewContent가 들어가는데, 이때 _pickedLocation 값이 있다면, Image.network를 통해 get 함수인 locationImage 리턴 값을 사용 할 수 있다.
get 함수 locationImage는
String get locationImage {
if (_pickedLocation == null) {
return '';
}
final lat = _pickedLocation!.latitude;
final lng = _pickedLocation!.longitude;
}
static map api 를 활용하여, 필요 정보 부분에 위도 값과 경도 값을 넣어주면 된다. (기타 뒤에 칼라나, zoom 정도를 바꿀 수 있음)
- 결과 화면
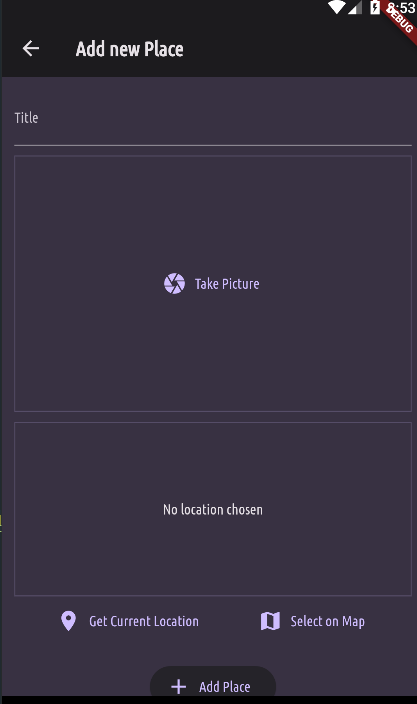 get current location 버튼 누르기 전
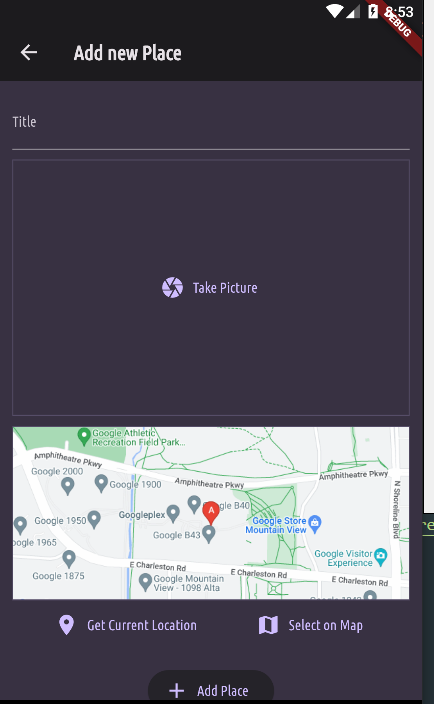 위치 값은 디폴트로 구글 본사로 되어있음.


