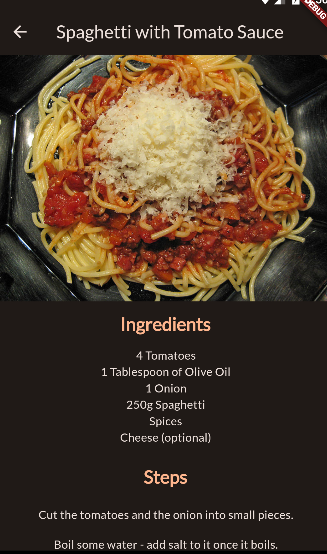
1. 세부화면2를 조금 더 꾸며보고, 하단 탭 네비게이션을 만들어보자.
- meal_detail.dart
import 'package:flutter/material.dart';
import 'package:meals/models/meal.dart';
class MealDetailsScreen extends StatelessWidget {
const MealDetailsScreen({
super.key,
required this.meal,
});
final Meal meal;
@override
Widget build(BuildContext context) {
return Scaffold(
appBar: AppBar(
title: Text(meal.title),
),
body: SingleChildScrollView(
child: Column(
children: [
Image.network(
meal.imageUrl,
height: 300,
width: double.infinity,
fit: BoxFit.cover,
),
const SizedBox(height: 14),
Text(
'Ingredients',
style: Theme.of(context).textTheme.titleLarge!.copyWith(
color: Theme.of(context).colorScheme.primary,
fontWeight: FontWeight.bold,
),
),
const SizedBox(height: 14),
for (final ingredient in meal.ingredients)
Text(
ingredient,
style: Theme.of(context).textTheme.bodyMedium!.copyWith(
color: Theme.of(context).colorScheme.onBackground,
),
),
const SizedBox(height: 24),
Text(
'Steps',
style: Theme.of(context).textTheme.titleLarge!.copyWith(
color: Theme.of(context).colorScheme.primary,
fontWeight: FontWeight.bold,
),
),
const SizedBox(height: 14),
for (final step in meal.steps)
Padding(
padding: const EdgeInsets.symmetric(
horizontal: 12,
vertical: 8,
),
child: Text(
step,
textAlign: TextAlign.center,
style: Theme.of(context).textTheme.bodyMedium!.copyWith(
color: Theme.of(context).colorScheme.onBackground,
),
),
),
],
),
));
}
}
1) 흐름을 따라가 보면 어려운 로직은 없다.
- 결과 화면

- tabs.dart(new)
import 'package:flutter/material.dart';
import 'package:meals/screens/categories.dart';
import 'package:meals/screens/meals.dart';
class TabsScreen extends StatefulWidget {
const TabsScreen({super.key});
@override
State<TabsScreen> createState() {
return _TabsScreenState();
}
}
class _TabsScreenState extends State<TabsScreen> {
int _selectedPageIndex = 0;
void _selectPage(int index) {
setState(() {
_selectedPageIndex = index;
});
}
@override
Widget build(BuildContext context) {
Widget activePage = const CategoriesScreen();
var activePageTitle = 'Categories';
if (_selectedPageIndex == 1) {
activePage = const MealsScreen(meals: []);
activePageTitle = 'Your Favorites';
}
return Scaffold(
appBar: AppBar(
title: Text(activePageTitle),
),
body: activePage,
bottomNavigationBar: BottomNavigationBar(
onTap: _selectPage,
currentIndex: _selectedPageIndex,
items: const [
BottomNavigationBarItem(
icon: Icon(Icons.set_meal),
label: 'Categories',
),
BottomNavigationBarItem(
icon: Icon(Icons.star),
label: 'Favorites',
),
],
),
);
}
}
1) 하단 탭 네비게이션을 사용하기 위해서는 stateful로 설정
2) body밑에 bottomNavigationBar 부분 추가
- main.dart
import 'package:flutter/material.dart';
import 'package:google_fonts/google_fonts.dart';
import 'package:meals/screens/tabs.dart';
final theme = ThemeData(
useMaterial3: true,
colorScheme: ColorScheme.fromSeed(
brightness: Brightness.dark,
seedColor: const Color.fromARGB(255, 131, 57, 0),
),
textTheme: GoogleFonts.latoTextTheme(),
);
void main() {
runApp(const App());
}
class App extends StatelessWidget {
const App({super.key});
@override
Widget build(BuildContext context) {
return MaterialApp(
theme: theme,
home: const TabsScreen(),
);
}
}
1) home 화면 TabsScreen으로 변경
-결과 화면

'코딩강의 > meals_app(플러터-유데미)' 카테고리의 다른 글
| ~170. Replacing Screens (Instead of Pushing) (0) | 2023.10.31 |
|---|---|
| ~166. Managing App-wide State & Data (0) | 2023.10.29 |
| 162. Adding Navigation to the MealDetails Screen (1) | 2023.10.28 |
| 161. Improving the MealItem Widget (0) | 2023.10.26 |
| 160. Introducing the Stack Widget (0) | 2023.10.26 |

