#10 Products
1. 모델에 product 추가
*schema.prisma
generator client {
  provider = "prisma-client-js"
}

datasource db {
  provider = "sqlite"
  url      = env("DATABASE_URL")
}

model User {
  id         Int        @id @default(autoincrement())
  username   String     @unique
  email      String?    @unique
  password   String?
  phone      String?    @unique
  github_id  String?    @unique
  avatar     String?
  created_at DateTime   @default(now())
  updated_at DateTime   @updatedAt
  SMSToken   SMSToken[]
  Product    Product[]
}

model SMSToken {
  id         Int      @id @default(autoincrement())
  token      String   @unique
  created_at DateTime @default(now())
  updated_at DateTime @updatedAt
  user       User     @relation(fields: [userId], references: [id], onDelete: Cascade)
  userId     Int
}

model Product {
  id          Int    @id @default(autoincrement())
  title       String
  price       Float
  photo       String
  description String

  created_at DateTime @default(now())
  updated_at DateTime @updatedAt
  user       User     @relation(fields: [userId], references: [id])
  userId     Int
}
2. 폴더 구조 변경 및 하단 탭바 생성
아래와 같이 (auth) 부분과 (tabs)부분을 나누어 주고, 하단 tabs에서 공용으로 사용하는 레이아웃을 별도로 만들어 주었다.
괄호 폴더는 url경로를 말하는것이 아니라, 개념상 구분을 위해 사용 하는 것이다. (별도 레이아웃 적용 하기 위해서도 가능)
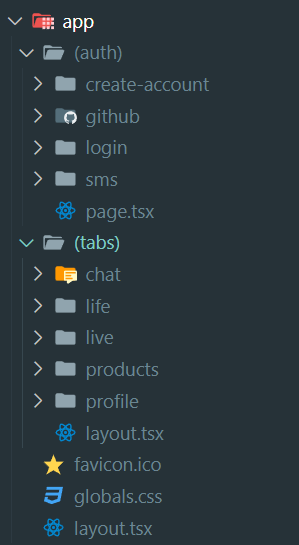
*(tabs)/layout.tsx
import TabBar from "@/components/tab-bar";

export default function TabLayout({ children }: { children: React.ReactNode }) {
  return (
    <div>
      {children}
      <TabBar />
    </div>
  );
}
1) 탭바 레이아웃 파일이고, TabBar는 별도 컴포넌트로 생성해두었다.
*components/tab-bar.tsx
"use client";

import {
  HomeIcon as SolidHomeIcon,
  NewspaperIcon as SolidNewspaperIcon,
  ChatBubbleOvalLeftEllipsisIcon as SolidChatIcon,
  VideoCameraIcon as SolidVideoCameraIcon,
  UserIcon as SolidUserIcon,
} from "@heroicons/react/24/solid";
import {
  HomeIcon as OutlineHomeIcon,
  NewspaperIcon as OutlineNewspaperIcon,
  ChatBubbleOvalLeftEllipsisIcon as OutlineChatIcon,
  VideoCameraIcon as OutlineVideoCameraIcon,
  UserIcon as OutlineUserIcon,
} from "@heroicons/react/24/outline";
import Link from "next/link";
import { usePathname } from "next/navigation";

export default function TabBar() {
  const pathname = usePathname();
  return (
    <div className="fixed bottom-0 w-full mx-auto max-w-screen-md grid grid-cols-5 border-neutral-600 border-t px-5 py-3 *:text-white">
      <Link href="/products" className="flex flex-col items-center gap-px">
        {pathname === "/products" ? (
          <SolidHomeIcon className="w-7 h-7" />
        ) : (
          <OutlineHomeIcon className="w-7 h-7" />
        )}
        <span>홈</span>
      </Link>
      <Link href="/life" className="flex flex-col items-center gap-px">
        {pathname === "/life" ? (
          <SolidNewspaperIcon className="w-7 h-7" />
        ) : (
          <OutlineNewspaperIcon className="w-7 h-7" />
        )}
        <span>동네생활</span>
      </Link>
      <Link href="/chat" className="flex flex-col items-center gap-px">
        {pathname === "/chat" ? (
          <SolidChatIcon className="w-7 h-7" />
        ) : (
          <OutlineChatIcon className="w-7 h-7" />
        )}
        <span>채팅</span>
      </Link>
      <Link href="/live" className="flex flex-col items-center gap-px">
        {pathname === "/live" ? (
          <SolidVideoCameraIcon className="w-7 h-7" />
        ) : (
          <OutlineVideoCameraIcon className="w-7 h-7" />
        )}
        <span>쇼핑</span>
      </Link>
      <Link href="/profile" className="flex flex-col items-center gap-px">
        {pathname === "/profile" ? (
          <SolidUserIcon className="w-7 h-7" />
        ) : (
          <OutlineUserIcon className="w-7 h-7" />
        )}
        <span>나의 당근</span>
      </Link>
    </div>
  );
}
1) url 경로에 따라 하단 이미지 색깔 변경이 가능하게끔 함
*아래는 결과 화면

3. skeleton 로딩화면
*products/page.tsx
async function getProducts() {
  await new Promise((resolve) => setTimeout(resolve, 10000));
}

export default async function Products() {
  const products = await getProducts();
  return (
    <div>
      <h1 className="text-white text-4xl">Products!</h1>
    </div>
  );
}
1) 임의로 10초 로딩시간 주었음
*products/loading.tsx
export default function Loading() {
  return (
    <div className="p-5 animate-pulse flex flex-col gap-5">
      {[...Array(10)].map((_, index) => (
        <div key={index} className="*:rounded-md flex gap-5 ">
          <div className="size-28 bg-neutral-700" />
          <div className="flex flex-col gap-2 *:rounded-md">
            <div className="bg-neutral-700 h-5 w-40" />
            <div className="bg-neutral-700 h-5 w-20" />
            <div className="bg-neutral-700 h-5 w-10" />
          </div>
        </div>
      ))}
    </div>
  );
}
1) 스켈레톤 화면, 10개를 뿌려주었음

4. products 페이지 꾸미기
*products/page.tsx
import ListProduct from "@/components/list-product";
import db from "@/lib/db";

async function getProducts() {
  const products = await db.product.findMany({
    select: {
      title: true,
      price: true,
      created_at: true,
      photo: true,
      id: true,
    },
  });
  return products;
}

export default async function Products() {
  const products = await getProducts();
  return (
    <div className="p-5 flex flex-col gap-5">
      {products.map((product) => (
        <ListProduct key={product.id} {...product} />
      ))}
    </div>
  );
}
1) 모든 상품을 가져오는 화면이다.
아래 컴포넌트를 연동했다.
*components/list-product.tsx
import Image from "next/image";
import Link from "next/link";

interface ListProductProps {
  title: string;
  price: number;
  created_at: Date;
  photo: string;
  id: number;
}

export default function ListProduct({
  title,
  price,
  created_at,
  photo,
  id,
}: ListProductProps) {
  return (
    <Link href={`/products/${id}`} className="flex gap-5">
      <div className="relative size-28 rounded-md overflow-hidden">
        <Image fill src={photo} alt={title} />
      </div>
      <div className="flex flex-col gap-1 *:text-white">
        <span className="text-lg">{title}</span>
        <span className="text-sm text-neutral-500">
          {created_at.toString()}
        </span>
        <span className="text-lg font-semibold">{price}</span>
      </div>
    </Link>
  );
}
1) 이미지 부모 div에서 rounded-md가 안먹히는데, 이때 overflow-hidden을 적용하면 된다.
2) Image 태그는 nextjs 제공하는 Image 최적화 라이브러리다. (품질 바뀌게 할 수 있고, 크기 자동 변경 등) 추 후 실제 서비스 할 때공식홈페이지에서 더 확인해보자.
*아래는 결과화면

5. Detail Skeleton
상품 세부 화면 스켈레톤을 꾸며주고 기타 다른 부분 수정해주자.
*app/products/[id]/page.tsx
async function getProduct() {
  await new Promise((resolve) => setTimeout(resolve, 60000));
}

export default async function ProductDetail({
  params: { id },
}: {
  params: { id: string };
}) {
  const product = await getProduct();
  return <span>Product detail of the product {id}</span>;
}
1) 상품 세부 화면
*app/products/[id]/loading.tsx
import { PhotoIcon } from "@heroicons/react/24/solid";

export default function Loading() {
  return (
    <div className="animate-pulse p-5 flex flex-col gap-5">
      <div className="aspect-square border-neutral-700 text-neutral-700 border-4 border-dashed rounded-md flex justify-center items-center">
        <PhotoIcon className="h-28" />
      </div>
      <div className="flex gap-2 items-center">
        <div className="size-14 rounded-full bg-neutral-700" />
        <div className="flex flex-col gap-1">
          <div className="h-5 w-40 bg-neutral-700 rounded-md" />
          <div className="h-5 w-20 bg-neutral-700 rounded-md" />
        </div>
      </div>
      <div className="h-10 w-80 bg-neutral-700 rounded-md" />
    </div>
  );
}
1) 스켈레톤 화면

*components/utils.ts
export function formatToTimeAgo(date: string): string {
  const dayInMs = 1000 * 60 * 60 * 24;
  const time = new Date(date).getTime();
  const now = new Date().getTime();
  const diff = Math.round((time - now) / dayInMs);

  const formatter = new Intl.RelativeTimeFormat("ko");

  return formatter.format(diff, "days");
}

export function formatToWon(price: number): string {
  return price.toLocaleString("ko-KR");
}
1) 며칠 전을 표현하기 위해 위와 같은 util을 만들었다.
Intl 관련해서는 해당링크 참조
https://developer.mozilla.org/en-US/docs/Web/JavaScript/Reference/Global_Objects/Intl#description
*components/list-product.tsx
import { formatToTimeAgo, formatToWon } from "@/lib/utils";
import Image from "next/image";
import Link from "next/link";

interface ListProductProps {
  title: string;
  price: number;
  created_at: Date;
  photo: string;
  id: number;
}

export default function ListProduct({
  title,
  price,
  created_at,
  photo,
  id,
}: ListProductProps) {
  return (
    <Link href={`/products/${id}`} className="flex gap-5">
      <div className="relative size-28 rounded-md overflow-hidden">
        <Image fill src={photo} alt={title} />
      </div>
      <div className="flex flex-col gap-1 *:text-white">
        <span className="text-lg">{title}</span>
        <span className="text-sm text-neutral-500">
          {formatToTimeAgo(created_at.toString())}
        </span>
        <span className="text-lg font-semibold">{formatToWon(price)}원</span>
      </div>
    </Link>
  );
}
1) 위 유틸 활용하여 적용
5. Product Detail
*products/[id]/page.tsx
import db from "@/lib/db";
import getSession from "@/lib/session";
import { formatToWon } from "@/lib/utils";
import { UserIcon } from "@heroicons/react/24/solid";
import Image from "next/image";
import Link from "next/link";
import { notFound } from "next/navigation";

async function getIsOwner(userId: number) {
  const session = await getSession();
  if (session.id) {
    return session.id === userId;
  }
  return false;
}

async function getProduct(id: number) {
  const product = await db.product.findUnique({
    where: {
      id,
    },
    include: {
      user: {
        select: {
          username: true,
          avatar: true,
        },
      },
    },
  });
  return product;
}

export default async function ProductDetail({
  params,
}: {
  params: { id: string };
}) {
  const id = Number(params.id);
  if (isNaN(id)) {
    return notFound();
  }
  const product = await getProduct(id);
  if (!product) {
    return notFound();
  }
  const isOwner = await getIsOwner(product.userId);
  return (
    <div>
      <div className="relative aspect-square">
        <Image fill src={product.photo} alt={product.title} />
      </div>
      <div className="p-5 flex items-center gap-3 border-b border-neutral-700">
        <div className="size-10 rounded-full">
          {product.user.avatar !== null ? (
            <Image
              src={product.user.avatar}
              width={40}
              height={40}
              alt={product.user.username}
            />
          ) : (
            <UserIcon />
          )}
        </div>
        <div>
          <h3>{product.user.username}</h3>
        </div>
      </div>
      <div className="p-5">
        <h1 className="text-2xl font-semibold">{product.title}</h1>
        <p>{product.description}</p>
      </div>
      <div className="fixed w-full bottom-0 left-0 p-5 pb-10 bg-neutral-800 flex justify-between items-center">
        <span className="font-semibold text-xl">
          {formatToWon(product.price)}원
        </span>
        {isOwner ? (
          <button className="bg-red-500 px-5 py-2.5 rounded-md text-white font-semibold">
            Delete product
          </button>
        ) : null}
        <Link
          className="bg-orange-500 px-5 py-2.5 rounded-md text-white font-semibold"
          href={``}
        >
          채팅하기
        </Link>
      </div>
    </div>
  );
}
1) url 부분이 숫자가 아니면 isNaN을 통해 notFound 화면을 보여준다.
2) url 부분 숫자가 db에서 조회가 안되면 notFound를 보여주고, 있으면 product 데이터를 가지고 온다.
3) session을 통해 사용자 id를 가져오고 해당 product 페이지 userId와 동일하면 해당 페이지에 대해 삭제 버튼을 준다.
(위 코드에서는 chat버튼이 있는데, 동일 유저면 chat 버튼을 없애야 한다), 삭제 버튼에 대해 기능 구현은 안했지만, 이전에 만든 로그아웃 기능과 유사하게 만들면 될듯 하다.
5. Image Hostnames
NextJS의 Image는 이미지를 자동으로 최적화를 해 주어 성능을 향상시키고 빠른 로딩이 되도록 해 준다.
하지만 외부 호스트의 이미지(다른 사이트의 이미지 링크 등)를 불러올 때는 보안 상의 이유로 이 기능이 허용되지 않는다.
따라서 next.config.mjs에서 hostname들을 등록해 주어야 한다.
(nextConfig > images > remotePatterns > hostname)
*깃헙 url로 된 아바타 사진 가지고 오려고 하니 아래와 같은 에러 발생

--> next.config에 hostname 하면 됨
*next.config.mjs
/** @type {import('next').NextConfig} */
const nextConfig = {
  images: {
    remotePatterns: [
      {
        hostname: "avatars.githubusercontent.com",
      },
    ],
  },
};

export default nextConfig;
6. load more 버튼으로 db 데이터 계속 가져오자
*(tabs)/products/page.tsx
import ProductList from "@/components/product-list";
import db from "@/lib/db";
import { Prisma } from "@prisma/client";

async function getInitialProducts() {
  const products = await db.product.findMany({
    select: {
      title: true,
      price: true,
      created_at: true,
      photo: true,
      id: true,
    },
    take: 1,
    orderBy: {
      created_at: "desc",
    },
  });
  return products;
}

export type InitialProducts = Prisma.PromiseReturnType<
  typeof getInitialProducts
>;

export default async function Products() {
  const initialProducts = await getInitialProducts();
  return (
    <div>
      <ProductList initialProducts={initialProducts} />
    </div>
  );
}
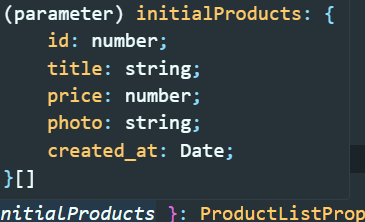
1) InitialProducts 타입은 저렇게 해도되고, 아니면 수동으로 하나씩 객체 타입을 넣어도 된다.
2) 테스트를 위해 db에서 product를 1개만 가져오고, load more버튼을 누를때 마다 1개씩 추가로 가져오는 것으로 만들것이다.
3) 이어서 ProductList 컴포넌트를 확인해보자
*components/product-list.tsx
"use client";

import { InitialProducts } from "@/app/(tabs)/products/page";
import ListProduct from "./list-product";
import { useState } from "react";
import { getMoreProducts } from "@/app/(tabs)/products/actions";

interface ProductListProps {
  initialProducts: InitialProducts;
}

export default function ProductList({ initialProducts }: ProductListProps) {
  const [products, setProducts] = useState(initialProducts);
  const [isLoading, setIsLoading] = useState(false);
  const [page, setPage] = useState(0);
  const [isLastPage, setIsLastPage] = useState(false);
  const onLoadMoreClick = async () => {
    setIsLoading(true);
    const newProducts = await getMoreProducts(page + 1);
    if (newProducts.length !== 0) {
      setPage((prev) => prev + 1);
      setProducts((prev) => [...prev, ...newProducts]);
    } else {
      setIsLastPage(true);
    }
    setIsLoading(false);
  };
  return (
    <div className="p-5 flex flex-col gap-5">
      {products.map((product) => (
        <ListProduct key={product.id} {...product} />
      ))}
      {isLastPage ? (
        "No more items"
      ) : (
        <button
          onClick={onLoadMoreClick}
          disabled={isLoading}
          className="text-sm font-semibold bg-orange-500 w-fit mx-auto px-3 py-2 rounded-md hover:opacity-90 active:scale-95"
        >
          {isLoading ? "로딩 중" : "Load more"}
        </button>
      )}
    </div>
  );
}
1) 상태값이 계속 변해야 하는 페이지 이기 때문에 use client 사용
2) 앞서 얘기한대로 타입은 위 코드대로 해도 되고, 수동으로 하나씩 타입을 지정해주어도 된다. (마우스 올려놓으면 보이는대로)
3) 버튼을 누를 때 마다 products를 1개씩 가져오는 로직이다.
4) 전체적인 흐름은 코드를 보면 알 수 있다.
*(tabs)/products/actions.ts
"use server";

import db from "@/lib/db";

export async function getMoreProducts(page: number) {
  const products = await db.product.findMany({
    select: {
      title: true,
      price: true,
      created_at: true,
      photo: true,
      id: true,
    },
    skip: page * 1,
    take: 1,
    orderBy: {
      created_at: "desc",
    },
  });
  return products;
}
1) products를 가져오는 actions 부분
2) 보통 해당 기능이 필요한 url폴더에 actions 파일을 넣는다. (별도로 빼도 되긴하겠지만, 이게 좋을듯?)
** 데이터 여러개 생성하는 방법
1. prisma 폴더에 seed.js 파일 생성
/prisma/seed.js
const { PrismaClient } = require('@prisma/client');
const prisma = new PrismaClient();
(async () => {
for (let i = 0; i < 100; i++) {
await prisma.product.create({
data: {
price: 134134,
description: '134134',
title: '134134134',
photo: '/pipe.png',
created_at: new Date(),
user: {
connect: {
id: 1,
},
},
},
});
}
})();
2. package.json에 추가
"prisma": {
"seed": "node prisma/seed.js"
},
3. 터미널에 npx prisma db seed 입력
with faker
1. npm install --save-dev @faker-js/faker
2. /prisma/seed.js
const { faker } = require('@faker-js/faker');
const { PrismaClient } = require('@prisma/client');
const prisma = new PrismaClient();
(async () => {
for (let i = 0; i < 100; i++) {
await prisma.product.create({
data: {
price: +faker.commerce.price({ min: 10000, max: 1000000 }),
description: faker.commerce.productDescription(),
title: faker.commerce.productName(),
photo: faker.image.urlPicsumPhotos(),
created_at: new Date(),
user: {
connect: {
id: 1,
},
},
},
});
}
})();
3. npx prisma db seed
7. 무한 스크롤
*components/product-list.tsx
"use client";

import { InitialProducts } from "@/app/(tabs)/products/page";
import ListProduct from "./list-product";
import { useEffect, useRef, useState } from "react";
import { getMoreProducts } from "@/app/(tabs)/products/actions";

interface ProductListProps {
  initialProducts: InitialProducts;
}

export default function ProductList({ initialProducts }: ProductListProps) {
  const [products, setProducts] = useState(initialProducts);
  const [isLoading, setIsLoading] = useState(false);
  const [page, setPage] = useState(0);
  const [isLastPage, setIsLastPage] = useState(false);
  const trigger = useRef<HTMLSpanElement>(null);
  useEffect(() => {
    const observer = new IntersectionObserver(
      async (
        entries: IntersectionObserverEntry[],
        observer: IntersectionObserver
      ) => {
        const element = entries[0];
        if (element.isIntersecting && trigger.current) {
          observer.unobserve(trigger.current);
          setIsLoading(true);
          const newProducts = await getMoreProducts(page + 1);
          if (newProducts.length !== 0) {
            setPage((prev) => prev + 1);
            setProducts((prev) => [...prev, ...newProducts]);
          } else {
            setIsLastPage(true);
          }
          setIsLoading(false);
        }
      },
      {
        threshold: 1.0,
      }
    );
    if (trigger.current) {
      observer.observe(trigger.current);
    }
    return () => {
      observer.disconnect();
    };
  }, [page]);
  return (
    <div className="p-5 flex flex-col gap-5">
      {products.map((product) => (
        <ListProduct key={product.id} {...product} />
      ))}
      {!isLastPage ? (
        <span
          ref={trigger}
          style={{
            marginTop: `${page + 1 * 900}vh`,
          }}
          className="mb-96 text-sm font-semibold bg-orange-500 w-fit mx-auto px-3 py-2 rounded-md hover:opacity-90 active:scale-95"
        >
          {isLoading ? "로딩 중" : "Load more"}
        </span>
      ) : null}
    </div>
  );
}
1) load more 버튼 대신에, 하단 특정 위치에 데이터를 load 할 수 있는 트리거를 만들어서 무한 스크롤 기능을 만들었다.
IntersectionObserver를 이용 하는 것인데, 아래 내용 참조 해보자. (지금은 정확히 이해 되지는 않는다)
*IntersectionObserver
https://developer.mozilla.org/en-US/docs/Web/API/IntersectionObserver
아직도 이 API 모르셨다고요? 개발자 인생 꿀템 소개!
(IntersectionObserver API 설명)
https://www.youtube.com/watch?v=iZhq7I42uaI&ab_channel=%EB%85%B8%EB%A7%88%EB%93%9C%EC%BD%94%EB%8D%94NomadCoders
2) 일단 위 코드는 테스트용으로 트리거 되는 부분을 아주 아래에 넣었지만 (시드 db 데이터 부족으로), 나중에 실제 서비스에서는 span 트리거 태그 부분에 스타일 marginTop삭제, className부분 mb-96 삭제하면 된다. (loading 될 때 로딩 중이라고 하기보다는 로딩 spin 이미지 넣어도 될듯)